
1. Introduction
Welcome to the third part of our blog post series on UEFI security, fuzzing, and exploitation. In Part One of the series, we merely reviewed existing tools and techniques to dump SPI flash memory to disk and extract the binaries which make up a UEFI firmware. In Part Two, we wore our reverse engineering hat and started analyzing UEFI modules: first statically using plugins to popular RE platforms and later on dynamically by emulating a UEFI environment on top of Qiling.
This part builds heavily on the previous two parts, so if you haven’t read them or feel like you need a refresher, please go back and make sure the core concepts are well understood before proceeding. In this part, we’ll finally reach the holy grail towards which we’ve been striving all these long months: making a coverage-guided fuzzer for UEFI code.
We hope you’ll enjoy the reading and find the fuzzer usable, effective and trustworthy.
2. Analyzing UEFI Attack Surface
Before any actual fuzzing can take place, we first have to conduct some general attack surface analysis of UEFI modules. In such analysis, our end goal is to find some “primitive” to influence the execution flow of UEFI modules from a lower-privileged context, ideally the OS. Depending on the nature of the particular OS we’re interested in, finding such primitives can get quite tricky. Windows’ philosophy, for example, is to limit access to UEFI services during runtime, and instead give preference to OS native drivers followed by ACPI runtime support. However, every rule has an exception, and this case is no different. To better approach the topic, we first have to say a few words about UEFI NVRAM variables.
Simply put, NVRAM variables are one of the key mechanisms used by UEFI modules to persist configuration data across boot cycles. Some of them (e.g., the variables related to secure boot, such as db, dbx, PK, KEK, etc.) are dictated by the UEFI standard, while others don’t have any predefined meaning and their purpose is left to the OEM’s judgement.
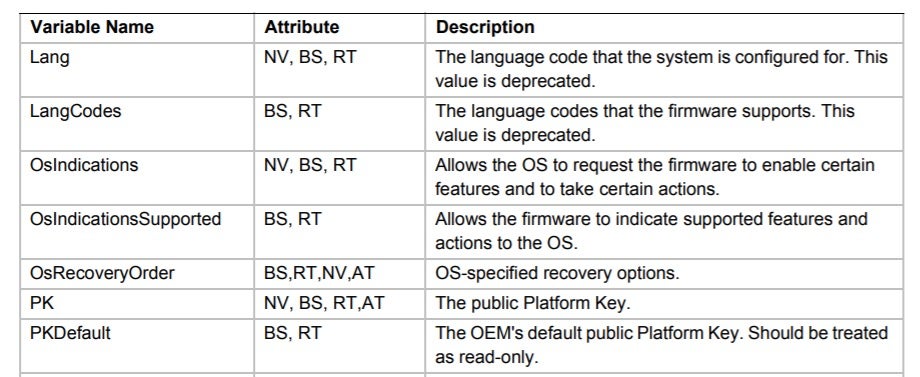
As can be seen from the screenshot above, each variable is composed out of a human-readable name and some attributes. These attributes determine if the variable is volatile or not (NV), whether it can be accessed during runtime (BS, RT), and whether access to the variable should be authenticated (AT). Although not explicitly stated, each variable is also linked to a unique vendor GUID lest there be potential name collisions.
Under the hood, NVRAM variables are stored on some non-volatile (surprise, surprise) region of memory, which in most cases is a dedicated volume on the BIOS region of the SPI flash we already got to know:
For interacting with NVRAM variables, the UEFI standard defines two runtime services: GetVariable() and SetVariable(). The prototype for GetVariable() is usually given as:
typedef EFI_STATUS(EFIAPI * EFI_GET_VARIABLE) (IN CHAR16 *VariableName, IN EFI_GUID *VendorGuid, OUT UINT32 *Attributes, OPTIONAL IN OUT UINTN *DataSize, OUT VOID *Data OPTIONAL)
GetVariable() works by searching the NVRAM store for a variable uniquely identified by the pair (VariableName, VendorGuid). If such a variable is found, GetVariable() fills in the appropriate Attributes, DataSize and Data parameters, otherwise an error is returned to the caller.
The corresponding prototype for the SetVariable() service is usually given as:
typedef EFI_STATUS(EFIAPI * EFI_SET_VARIABLE) (IN CHAR16 *VariableName, IN EFI_GUID *VendorGuid, IN UINT32 Attributes, IN UINTN DataSize, IN VOID *Data)
SetVariable() works by creating or updating the variable uniquely identified by the pair (VariableName, VendorGuid). It sets its contents based on the DataSize and Data parameters, and finally updates its attributes according to the value of the Attributes parameter.
From a fuzzing perspective, NVRAM variables are particularly attractive because there’s almost a 1:1 mapping between the UEFI services we just listed and system calls exposed by the underlying OS. The Windows kernel, for example, exports the ExGetFirmwareEnvironmentVariable and ExSetFirmwareEnvironmentVariable functions that lets kernel-mode drivers retrieve the contents of these variables or modify them as they see fit. Even more surprisingly, this functionality is also available to user-mode applications (!), in the form of GetFirmwareEnvironmentVariable and SetFirmwareEnvironmentVariable APIs, both exported from kernel32.dll.

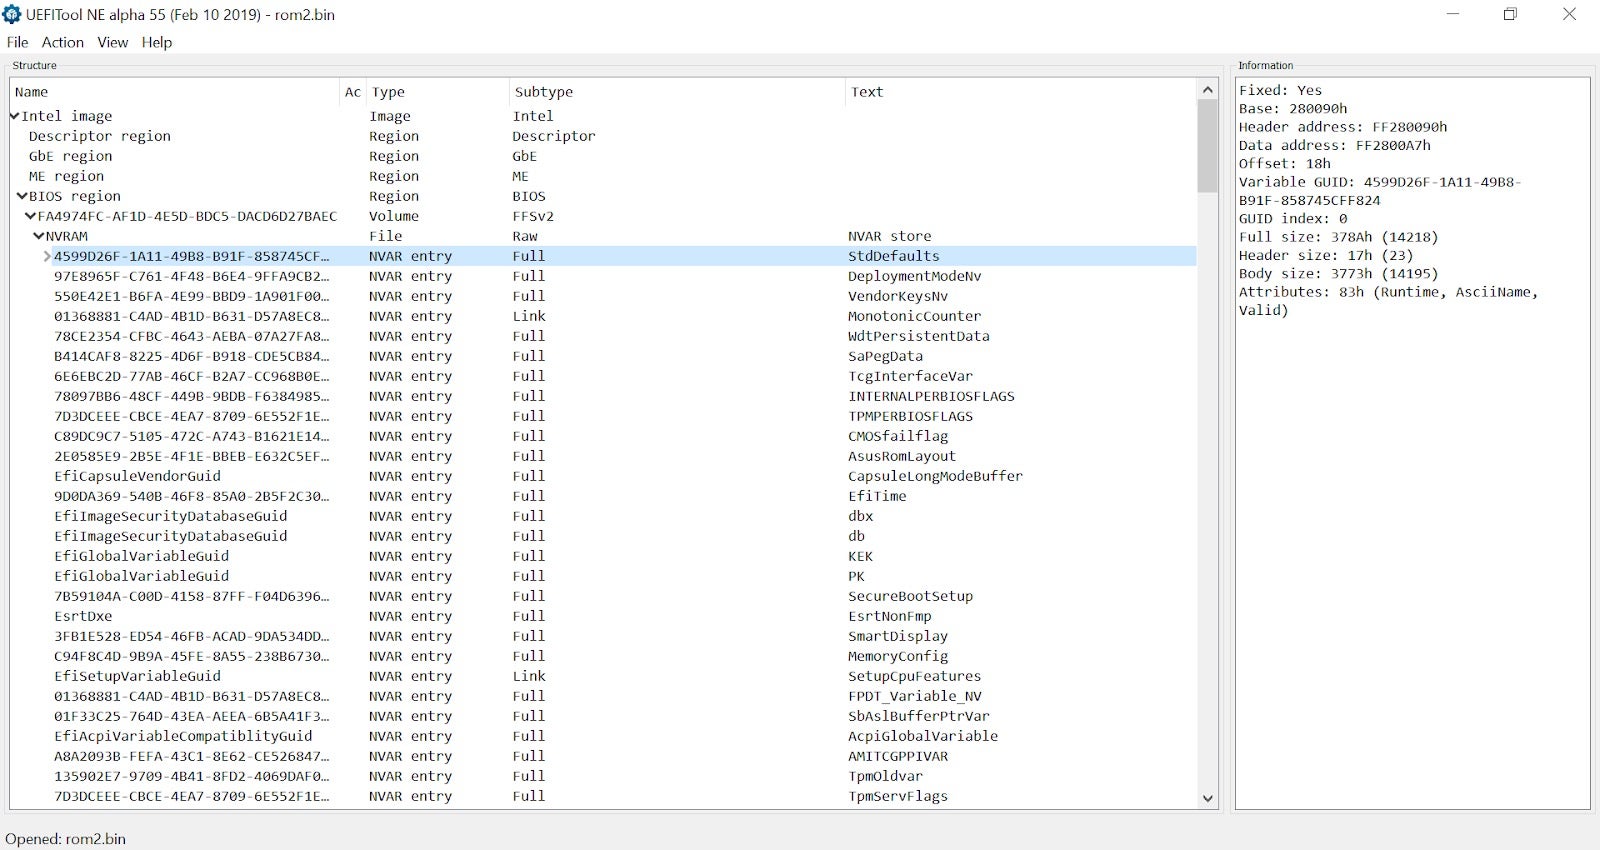
It’s worth pointing out that while some of these variables are small in size and simple in structure (e.g. boolean flags, counters, etc.), others can get quite big and complex. For example, the notorious Setup variable (usually used to aggregate configuration options from the BIOS setup screen) is a ~4KB binary blob on our test system. Given these size estimates, it wouldn’t be unreasonable to assume that some OEMs make implicit assumptions about the contents of such variables, and might have potential bugs when attempting to parse them. Since we just demonstrated that the contents of these variables can be controlled (at least partially) by attackers running less privileged code, they form a good attack surface and will be the focal point of our fuzzing efforts.
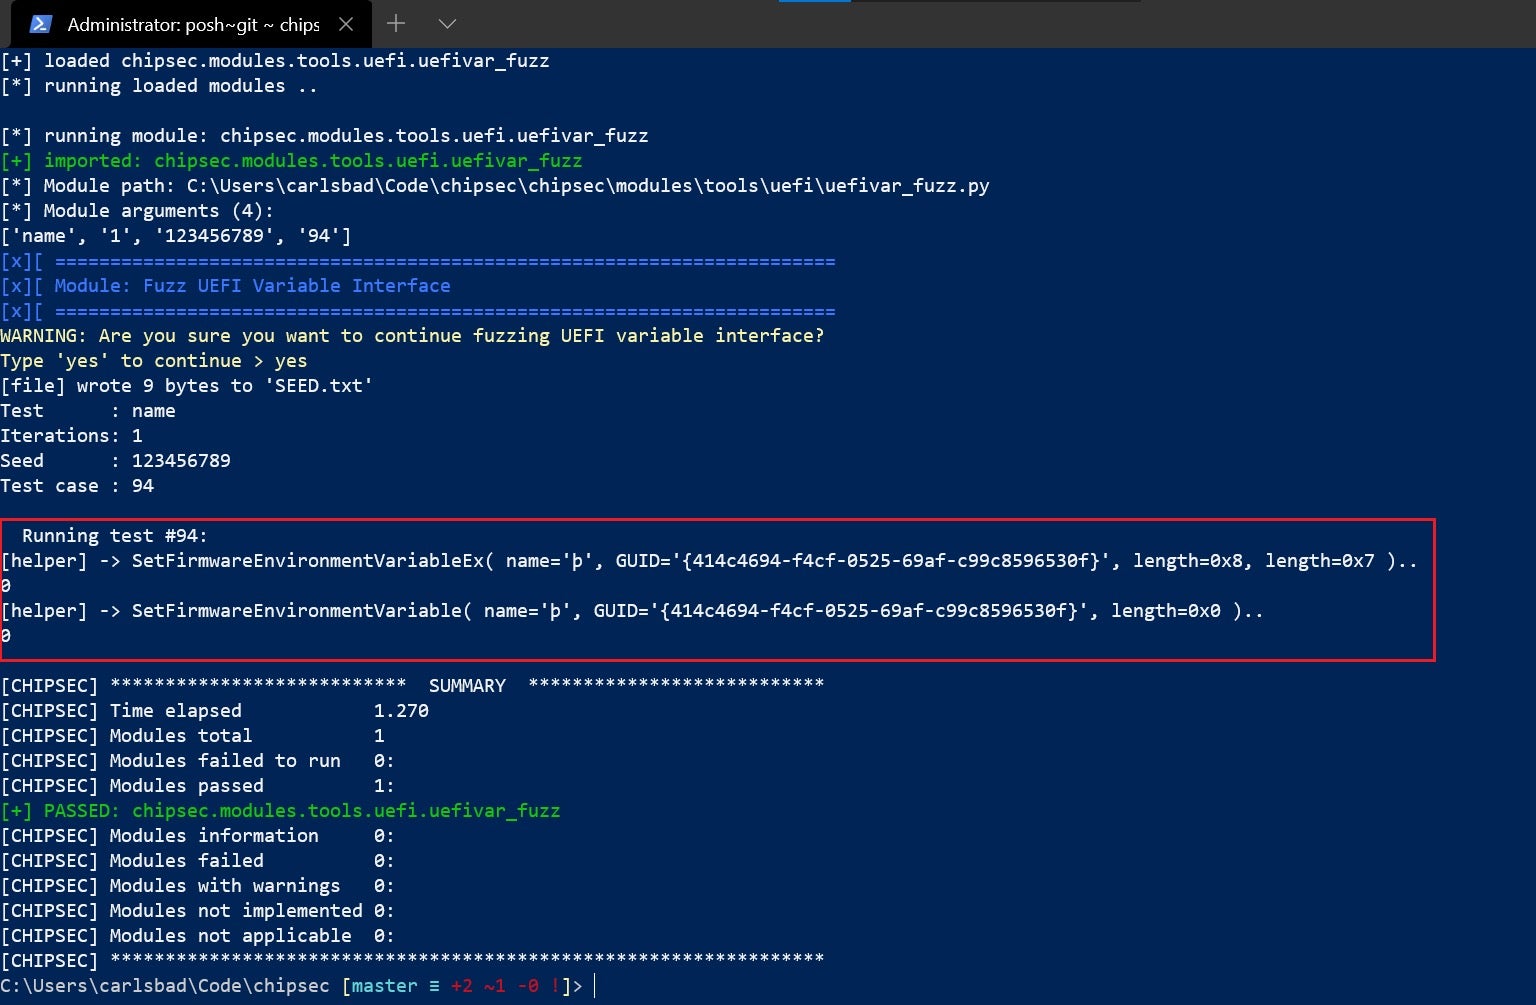
Fuzzing UEFI NVRAM variables is not an entirely new idea. The most notable predecessor of our endeavours in this field is chipsec, whose implementation for a module capable of fuzzing UEFI variables goes back to 2017. However, careful examination of the source code make some notable differences between chipsec’s approach and our’s immediately stick out:
- chipsec’s aim is to fuzz the implementation of SetVariable() itself. It does so by calling it repeatedly with mutated arguments such as the variable’s name, attributes, GUID, data, size, etc. On the other hand, we are less interested in fuzzing SetVariable() itself and are more inclined towards finding bugs in UEFI modules that read, parse and are otherwise influenced by the contents of such variables.
- chipsec implemented what’s commonly referred to as a dumb fuzzer. By “dumb” we mean any fuzzer that doesn’t get any feedback from the fuzzed target. This, in turn, hinders it from generating mutations intelligently and as a result, the best it can do is flip some random bits and hope one of them will be manifested in a noticeable way. In contrast, our fuzzer takes advantage of coverage information recorded by AFL++ to help guide the mutation process towards more promising directions.
- In addition to that, chipsec’s fuzzer is meant to run on a physical machine, which puts it at risk of becoming a brick. Such dangers obviously don’t exist when the fuzzer runs in a sandboxed environment such as Qiling.
Despite all these shortcomings, chipsec’s fuzzer is still an invaluable tool, and can be exercised (with caution!) using a simple command-line such as the following:
chipsec_main.py -m tools.uefi.uefivar_fuzz -a name,1,123456789,94
3. Pool Sanitizer
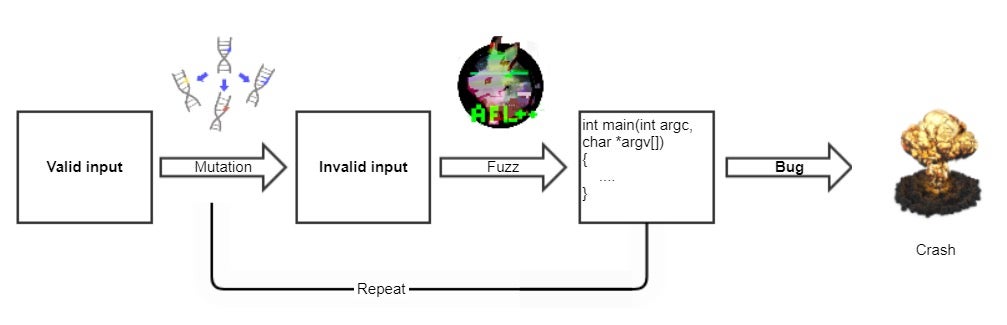
Mutation-based fuzzing is mostly driven by the following set of observations:
- Mutations on valid inputs might generate invalid inputs
- If not handled properly by the target, invalid inputs might trigger memory-corruption bugs
- Memory-corruption bugs are normally manifested as crashes
On its own, these assumptions are quite simplistic and don’t hold all the time. As an example, let’s consider a simple, stack-based buffer overflow. If the overflow isn’t “deep” enough, chances are it will not overwrite the saved return address and as such will not be manifested as a crash. Even so, a couple of reasons make it extremely important to detect these cases as well:
- First, with a bit of luck the fuzzer might find some other mutation to help transform a “shallow” overflow into a “deep” overflow.
- Second, when crafted properly, even a “shallow” overflow might be beneficial to the attacker. In the case of a stack overflow, for example, we can overwrite the values of other local variables and therefore influence program execution.
To help the fuzzer treat these cases the same as actual crashes, we need the help of sanitizers. Put simply, sanitizers are an umbrella term used to denote any instrumentation strategy which enforces more rigorous checks on the executing code. If one of these checks fails during runtime, the sanitizer can deliberately crash the process, thus notifying the fuzzer that a potentially vulnerable path has just been discovered.
The use of sanitizers is not limited exclusively to fuzzing. In fact, most sanitizers are used by developers. By incorporating these tools into their workflow, developers can quickly propagate bugs which can otherwise stay undetected for long periods of time. Notable examples of these sanitizers include Google’s sanitizers suite (AddressSanitizer, MemorySanitizer, LeakSanitizer, etc.), Microsoft’s ApplicationVerifier and the old and beloved Valgrind.
For our UEFI NVRAM fuzzer, we were mostly interested in applying sanitization to pool services such as AllocatePool() and FreePool(). Like any other dynamic memory allocator, the UEFI pool is also susceptible to some patterns of misuse. Among others, these include:
- Pool overflow/underflow: in which a misbehaving piece of code writes data beyond the limits of a given pool buffer, thus corrupting adjacent memory.
- Out-of-bounds access: in which an attempt is made to read data which spans beyond the bounds of a given pool buffer.
- Double-frees: in which the same pool block is freed twice.
- Invalid frees: in which an attempt is made to free some piece of memory which does not belong to the pool in the first place. Depending on the particular pool implementation, this pattern can result in memory corruption as well.
- Use after free: in which a piece of code accesses a pool block after it was freed.
During the development of the sanitizer, we took some inspiration and borrowed some clever ideas from the BaseSAFE project, which includes similar functionality. We implore you to check out their project and read through the accompanying paper (especially section 4.7 – Drop-In Heap Sanitizer). Essentially, the pool sanitizer hooks core pool services such as allocate() and free() and instruments them as follows:
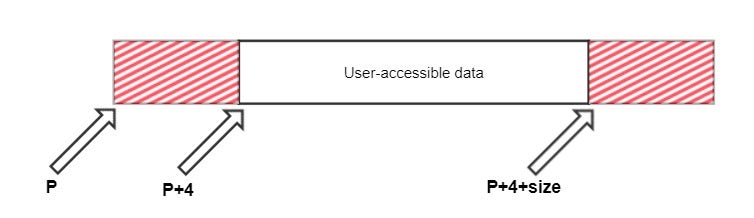
- allocate(size): For every allocation request that is made, the sanitizer first adds 8 bytes of auxiliary data. That means that if the user asked for X bytes, the actual block will be of size X+8. Next, the pointer that is to be returned to the caller is shifted by 4 bytes. This leaves us with two “padding” areas, each 4 bytes long. By using some Qiling memory APIs we can make these “padding” areas unreadable and unwritable. As a result, any attempt to access these “padding” areas will be trapped and result in an exception. By leveraging this scheme, we can detect most cases of pool overflows and underflows, even those that originate from off-by-one bugs and usually go undetected.
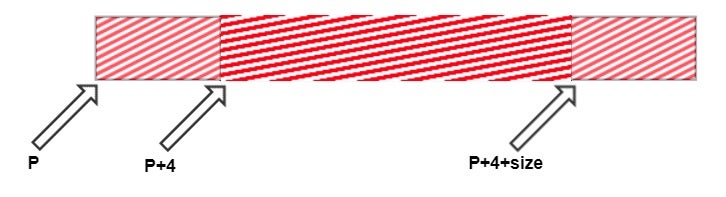
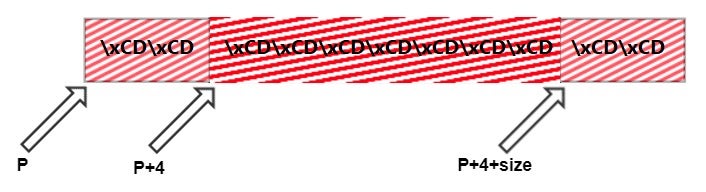
- free(ptr): When a block is freed, we first mark the user-accessible part (starts at P+4 and ends at P+4+size) as inaccessible. As a result, any attempt to access the block while it is freed will be detected. In addition, unlike a real-world heap (which should take into account performance and memory-demand issues) we make sure this chunk won’t ever be allocated again. This saves us the hassle of maintaining a free list and managing the transitions between different block states.
Another significant challenge we had to solve has to do with overflows and other bugs whose origin is a library function. By design, all hook types supported by Unicorn engine can only be triggered by emulated CPU instructions and not by the framework itself. This, in turn, leads to some interesting and counterintuitive implications.
As a concrete example, let’s consider a simple UEFI application that calls a boot service such as CopyMem(), with one of the buffers being a memory region marked as inaccessible. Now, suppose that the implementation for CopyMem() is given by the application itself, as would be the case if the compiler chooses to inline the function. This scenario will obviously raise an exception at runtime, so there’s nothing peculiar about it.
Now, consider the case where the implementation for CopyMem() is never given explicitly at the binary level. Instead, calls to the CopyMem() function are intercepted and its effects are simulated on top of Qiling. Such implementation will probably make use of framework-specific APIs to write to the memory directly, thus bypassing any hooks installed for the target memory buffer.
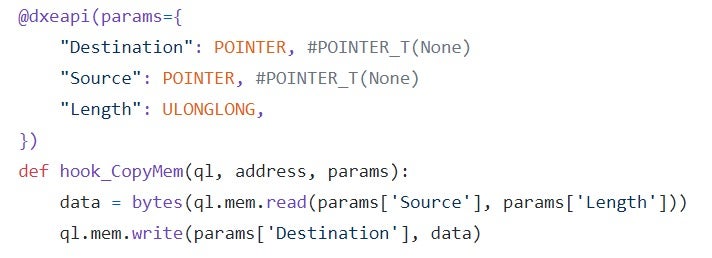
Figure 9 – a possible implementation for the CopyMem() service. By writing directly to memory, such implementation will not trigger any hook placed on the Destination buffer.
To rectify this, we extended the sanitizer to make use of canary values. Basically, before a portion of a pool buffer is marked as inaccessible, it is filled with some known magic value (by default – 0xCD). Then, at the end of the execution, the sanitizer can loop through all these chunks and verify that they weren’t corrupted in any way. Using this technique we can only check for buffer overflows after the fact (i.e. we won’t be notified immediately), but it is far better than letting these cases slip by.
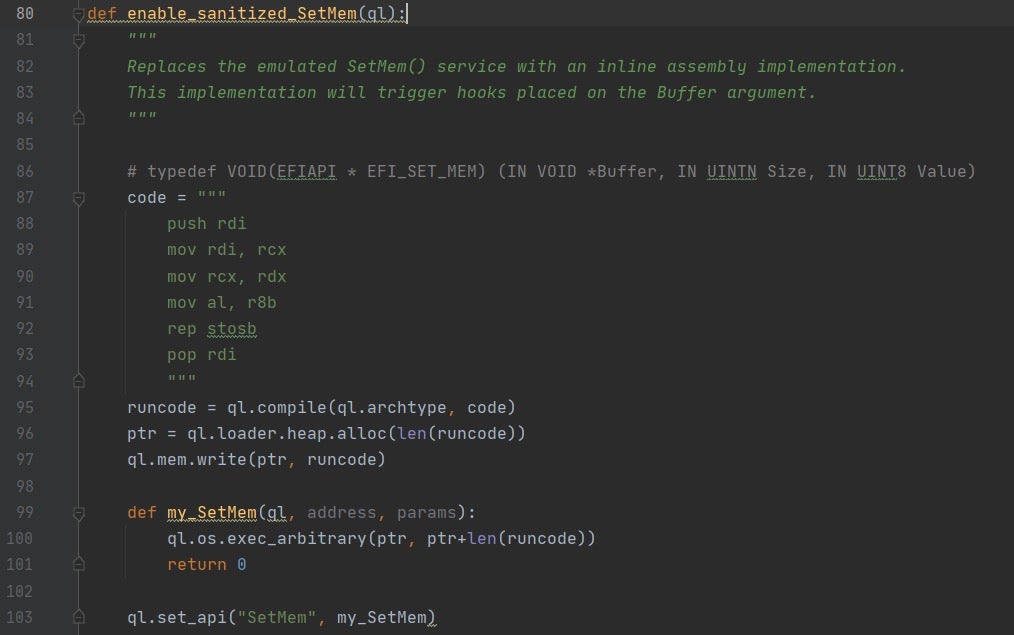
Yet another approach to mitigate this issue stems from the fact that both CopyMem() and SetMem() can be programmed in hand-written assembly quite easily. While it’s true that a top-notch implementation for memcpy() and memset() is anything but simple, a naive, non performance-oriented version can be constructed with just a handful of x86 instructions. Because of that, a possible solution scheme is to introduce assembly versions for these services, compile and inject them into the emulation environment and then force all clients of CopyMem() and SetMem() to use them. By doing so, all byte transfers become actual CPU instructions backed by Unicorn engine, and as such they’ll be susceptible to interception by all the different hook types.
4. Detecting Uninitialized Memory Disclosures
While searching for UEFI drivers that have a lot of interactions with NVRAM variables, we accidentally came across a curious looking function in one of the modules. After annotating it using efiXplorer, the decompiled pseudo-code looked somewhat like this:

Let’s analyze this function piece by piece to see what’s going on.
- First (1), a large buffer of size 4122 bytes is allocated on the stack. This buffer is not zero-initialized and so it currently holds leftovers from previous function calls.
- Later on (2), a variable named DataSize is initialized to 4122, the size of the stack buffer. Then, the driver calls the GetVariable() service to read the contents of a variable named CpuSetup into the stack buffer. As a result, DataSize will be modified to reflect the actual number of bytes which were read from NVRAM.
- After some other irrelevant operations, byte 0x5A2 of the stack buffer is compared (3) against the value of 2.
- If the result of comparison turns out to be true, the modified stack buffer is written back to the CpuSetup NVRAM variable (4). Notice that for the write, the driver passes a hardcoded value of 4122 as the size of the buffer.
Like we said in the previous section, our assumption is that NVRAM variables can be controlled at least partially by attackers. An interesting puzzle is to try to figure out what would happen if we set CpuSetup to any blob which is shorter than 4122 bytes. In that case, we can clearly see that even after the call to GetVariable() in (2), the stack buffer would still contain some uninitialized bytes. If, in addition to that, we also set byte 0x5A2 to be equal to 2, then these uninitialized bytes would be written back to NVRAM as part of processing the SetVariable() call in (4). Since NVRAM variables can be queried from the OS, using such a technique we can theoretically disclose up to 4122 – 1442 (0x5A2) = 2680 bytes of uninitialized stack memory.
We find it hard to believe that this particular bug can be exploited in the real world because we suspect too many things depend on the full value of CpuSetup, so it can’t be truncated freely by attackers. However, under a more controlled environment offered by Qiling we managed to exploit it for PoC purposes. To accomplish this, we poisoned the stack with a distinguished marker byte and then saw the traces of these marker bytes as they were written back to CpuSetup. A short video documenting our attack can be viewed here.
Although not realistically exploitable, this case proved to us that NVRAM variables can be used not only as an attack vector but also as a channel for data exfiltration. Depending on the particular application, the leaked data can be highly sensitive or valuable to the attacker in order to exploit other vulnerabilities or bypass security mitigations of the platform (we may even think of an SMM driver that discloses SMRAM memory this way). In a nutshell, this case convinced us to start looking for methods to automatically detect info leaks of that sort. But how can this be done in practice?
Enter taint analysis. Formally speaking, the purpose of taint analysis was defined by researchers from Carnegie Mellon University as the ability to “track information flow between sources and sinks. Any program value whose computation depends on data derived from a taint source is considered tainted (…). Any other value is considered untainted (…). A taint policy … determines exactly how taint flows as a program executes, what sorts of operations introduce new taint, and what checks are performed on tainted values.”
In a typical security research, taint analysis is usually applied to values which are under the user’s control with the intent of discovering what parts of the program can be influenced by an attacker and to what degree. Here, we’ll exercise taint analysis in a somewhat unorthodox fashion. Instead of applying taint to user-controlled memory, we’ll taint uninitialized memory and trace it with the hope it’ll be eventually disclosed to NVRAM.
Even though a simple taint engine for the x86 architecture can be built almost from scratch quite easily, we preferred using a more trustworthy off-the-shelf solution. When choosing which taint engine to use, the most prominent contender was without a shadow of a doubt Triton by Jonathan Salwan. Other engines for the x86 architecture exist and have their relative pros and cons, but eventually we decided to go for Triton because it plays nicer with Qiling than most of them.
Experiment: Taint Analysis with Triton
To demonstrate Triton’s taint analysis capabilities we’ll conduct some small proof-of-concept demonstrations. Feel free to skip this part if you think you already have enough hands-on experience with taint analysis to move along. To conduct the experiment, follow these steps:
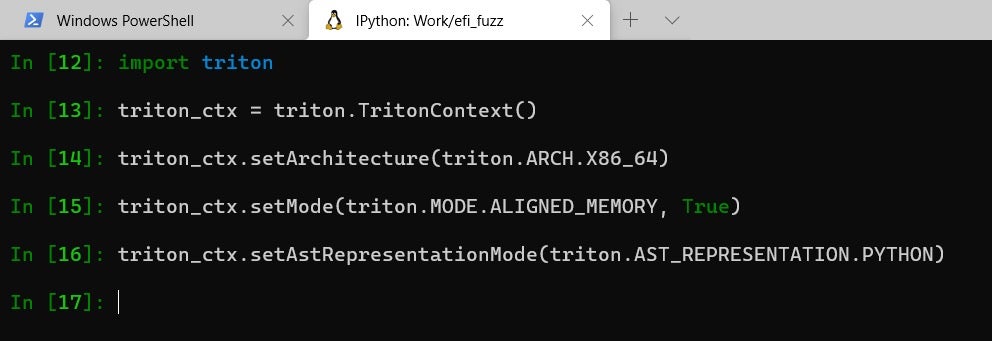
- Clone, build and install Triton. To make sure Triton is properly installed, open an IPython shell and type import triton, which should complete successfully.
- Initialize a TritonContext object as follows:
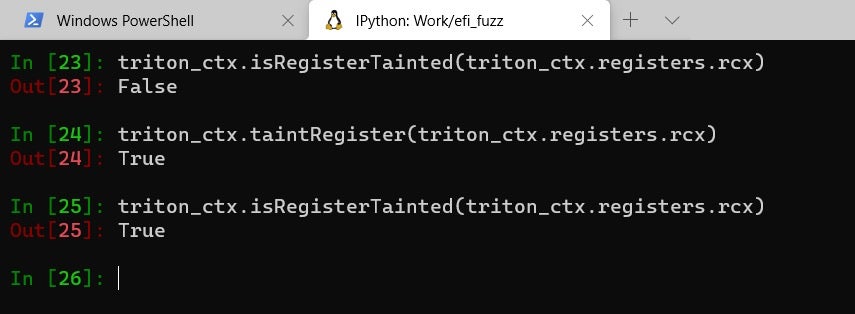
- For demonstration purposes, let’s taint one of the general purpose registers, say rcx.
- Now, let’s process some x64 instructions and see the taint propagation in action. We’ll use a simple mov rax, rcx instruction and expect that the taint will be propagated from one register to another:
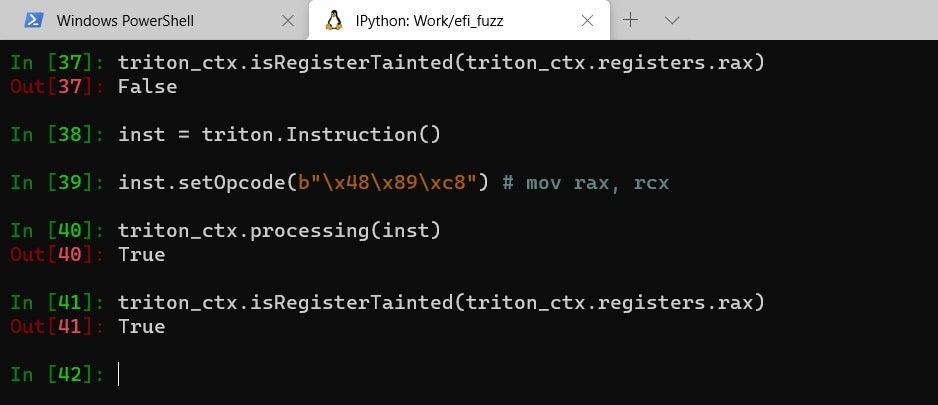
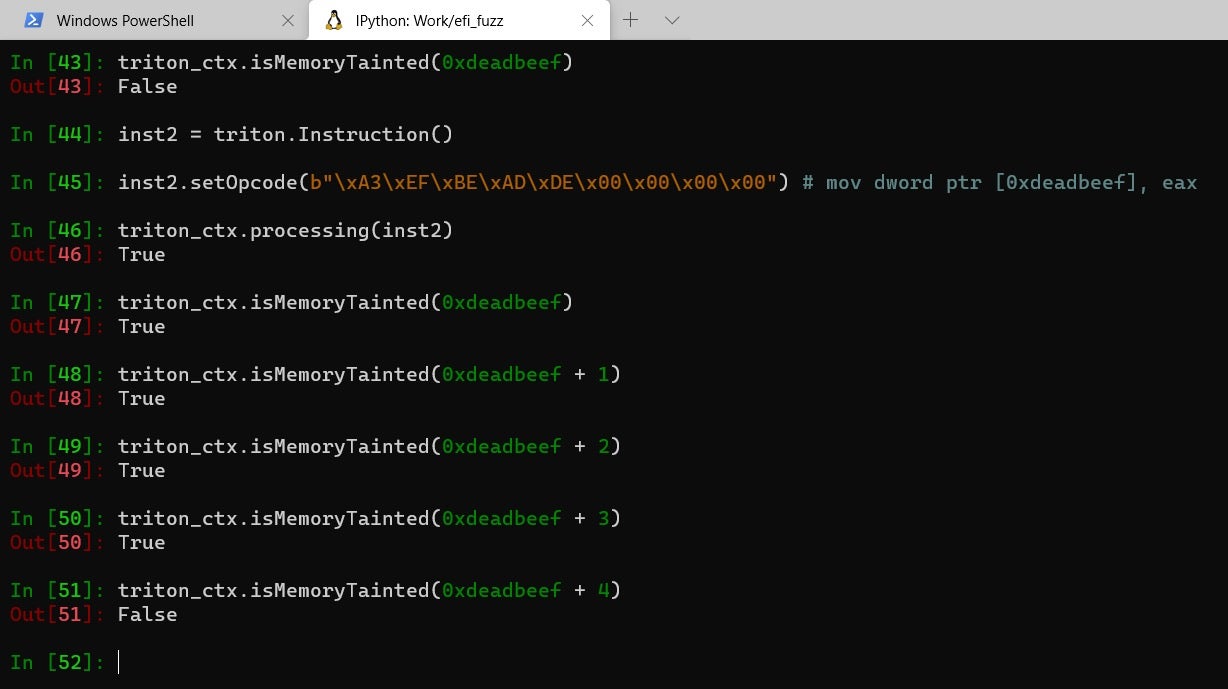
- Once rax is tainted we can move on to process some other instructions, possibly ones which perform a memory store. Also, note how the tainting of rax implicitly taints all its sub-registers (eax, ax, etc.)
Sources of uninitialized memory:
Like many other environments, uninitialized memory in UEFI comes from two main sources:
- Pool memory: as mentioned in Part Two, the main interface to the pool allocator is a boot service called AllocatePool(), which for performance reasons doesn’t zero-initialize the contents of the buffer. EDK2, the reference implementation for UEFI, contains some higher-level functions such as AllocateZeroPool as part of its MemoryAllocationLib. However, UEFI drivers can (and often do) use pool-related services directly.
For tracking uninitialized pool memory, we placed a post-op hook on AllocatePool() and simply tainted the address range for the buffer:
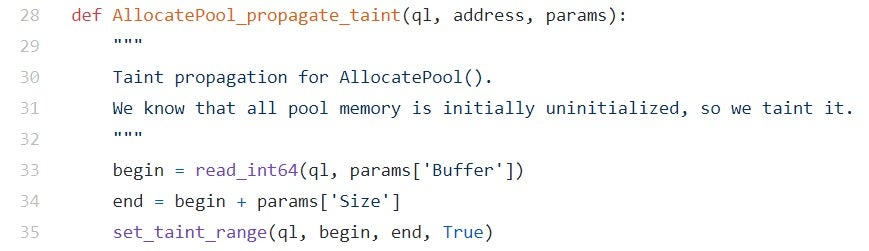
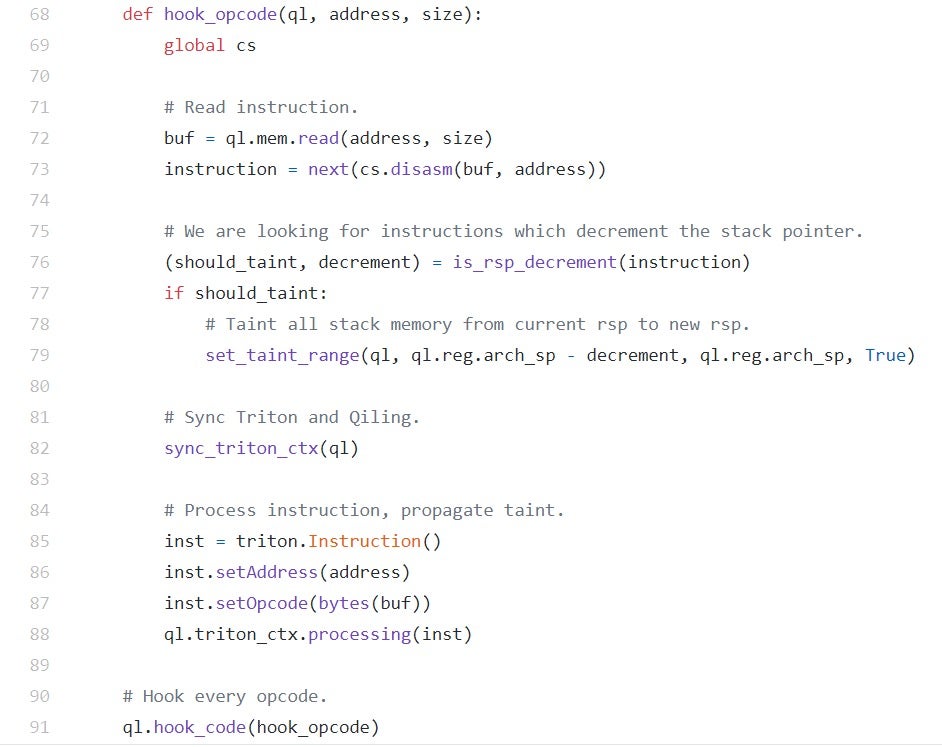
Figure 12 – taint propagation for AllocatePool() - Stack buffers: as the previous example demonstrated, unless explicitly initialized by the programmer or by a compiler flag such as InitAll, all stack buffers are basically uninitialized. For tainting stack memory, we used Qiling’s hook_code function to register a callback which will be invoked for every single instruction. From that callback, we can disassemble and dissect the instruction using a disassembler library such as Capstone engine.
Basically, to detect the “creation” of uninitialized stack buffers we need to identify instructions which decrement the stack pointer (rsp on x64) in a fixed number of bytes. Usually, these instructions are of the form: sub rsp, imm although we noticed that sometimes GCC emits code of the form add rsp, -imm. To identify these two cases we created a small utility function named is_rsp_decrement, which is given here. The code should be quite self explanatory.
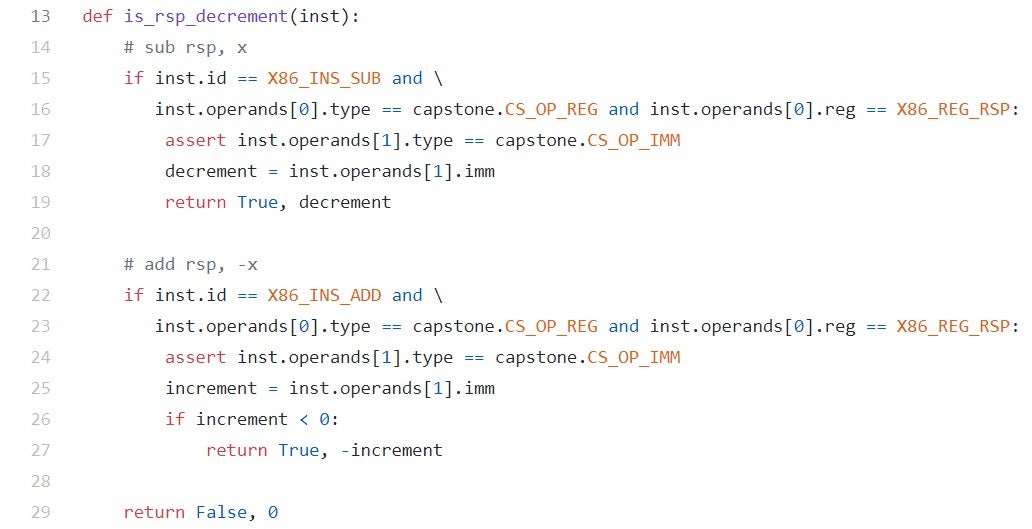
Figure 13 – identifying uninitialized stack buffers
After such an instruction has been encountered and the decrement was identified, we can simply taint all data on the stack between the current rsp and rsp – decrement:
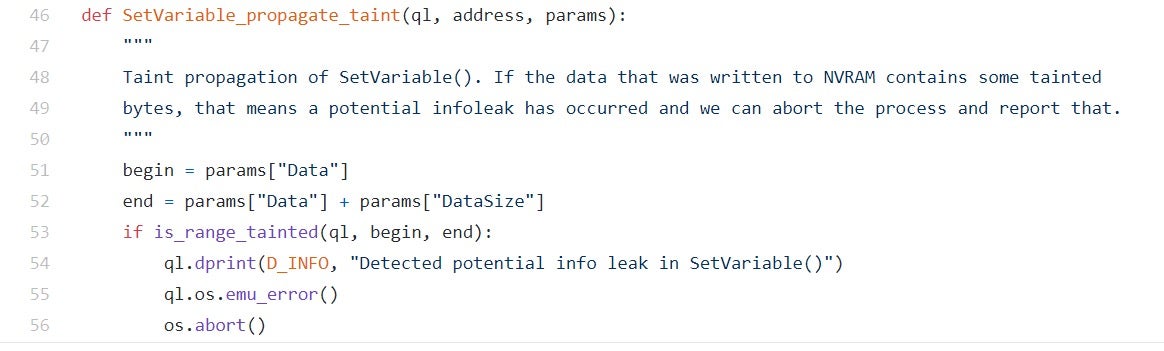
The last piece of the puzzle has to actually check whether or not uninitialized memory has been leaked. For that, we placed another post-op hook on SetVariable() and simply probed the data buffer to see if it contains at least one byte that is tainted. If that’s the case, we deliberately crash the process to notify the fuzzer that a potential info leak has just been discovered.
5. Efi-Fuzz
Our treatment of UEFI so far is far from complete. With a specification that spans just over 2700 pages, UEFI is yet another example of the digital behemoth which is so flourishing these days. Like many other specifications and technologies of that scale, it’s extremely difficult for one person to grasp it all in a single lifetime, no matter how talented he or she might be. Still, we believe it would be fair to say that we covered just enough UEFI background to get us moving on to some actual fuzzing.
In this section, we’ll introduce efi-fuzz – a simple, coverage-guided fuzzer for fuzzing the contents of NVRAM variables. We’ll start by giving a detailed walkthrough on how to set up the fuzzing environment correctly and then show how to fuzz a test application created specifically for that matter. Basically, to use efi-fuzz one has to follow these steps:
- If running on Windows, install WSL. We recommend WSL2 as opposed to the original WSL, which tends to be slow sometimes. The full installation instructions for Windows 10 can be found here: https://docs.microsoft.com/en-us/windows/wsl/install-win10
- Inside the WSL distribution, install some necessary packages that will allow us to compile C source code: sudo apt install build-essential automake
- Install AFL++ with Unicorn mode support. The full build instructions can be found here, but we’ll list them here anyway for the sake of completeness.
- Clone the repository:
git clonehttps://github.com/AFLplusplus/AFLplusplus - Build core AFL++ binaries:
make - Build the Unicorn support feature:
cd unicorn_mode./build_unicorn_support.sh - Install everything:
make install
- Clone the repository:
- Acquire and unpack the UEFI firmware you wish to fuzz. For the full technical details on how this is done is practice, please refer to the first part of the series or other sources such as Rootkits and Bootkits.
- Clone the fuzzer and install required dependencies:
git clonehttps://github.com/Sentinel-One/efi_fuzzpip install -r efi_fuzz/requirements.txt - Prepare the emulated NVRAM environment which will be used by Qiling to service calls to GetVariable(). For flexibility reasons, the fuzzer doesn’t consume its NVRAM store from the SPI dump directly, but rather from a pickled Python dictionary which should be prepared in advance. To create this dictionary from the SPI dump, use the following command:
python scripts/prepare_nvram.py
Figure 16 – pickle’ing the NVRAM environment - Prepare the initial corpus for the NVRAM variables. Like the vanilla AFL, AFL++ expects the seeds for the mutation process to be supplied in the form of binary files. To satisfy this requirement, use the prepare_afl_corpus.py script:
python scripts/prepare_afl_corpus.py afl_inputsAfter the script is done, all seed files will be neatly placed under the afl_inputs directory. By design, each variable gets its own dedicated subdirectory. Also, notice that when several instances of the same variable have been found on the SPI dump (on different FVs maybe), then each seed file will be suffixed with its sequential number (e.g. VarName_0, VarName_1, etc.)
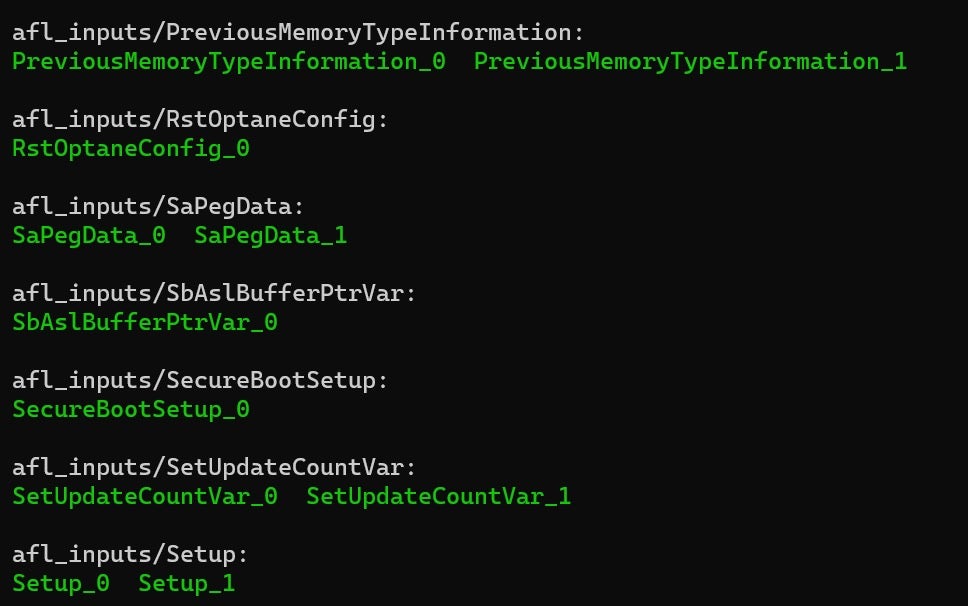
Figure 17 – Initial seeds for the fuzzer. Output is snipped from: ls -R afl_inputs - Choose the target module to fuzz. Obviously, the target module should fetch the contents of some NVRAM variables during its execution. As a rule of thumb, modules who only rely on “thin” variables such as boolean flags are less prone to parsing vulnerabilities and therefore modules who operate on “thick” variables such as Setup should be preferred.
- Perform a dry run of the fuzzer. During the dry run, the target module is emulated without any involvement from AFL’s side. We conduct such a dry run to make sure that:
- The target module indeed fetches the contents of some NVRAM variables.
- The target module runs to completion successfully.
To mount a dry run, use the following command:
python efi_fuzz.py <target> <nvram> <varname> <seed>The following screenshot better illustrates the process:
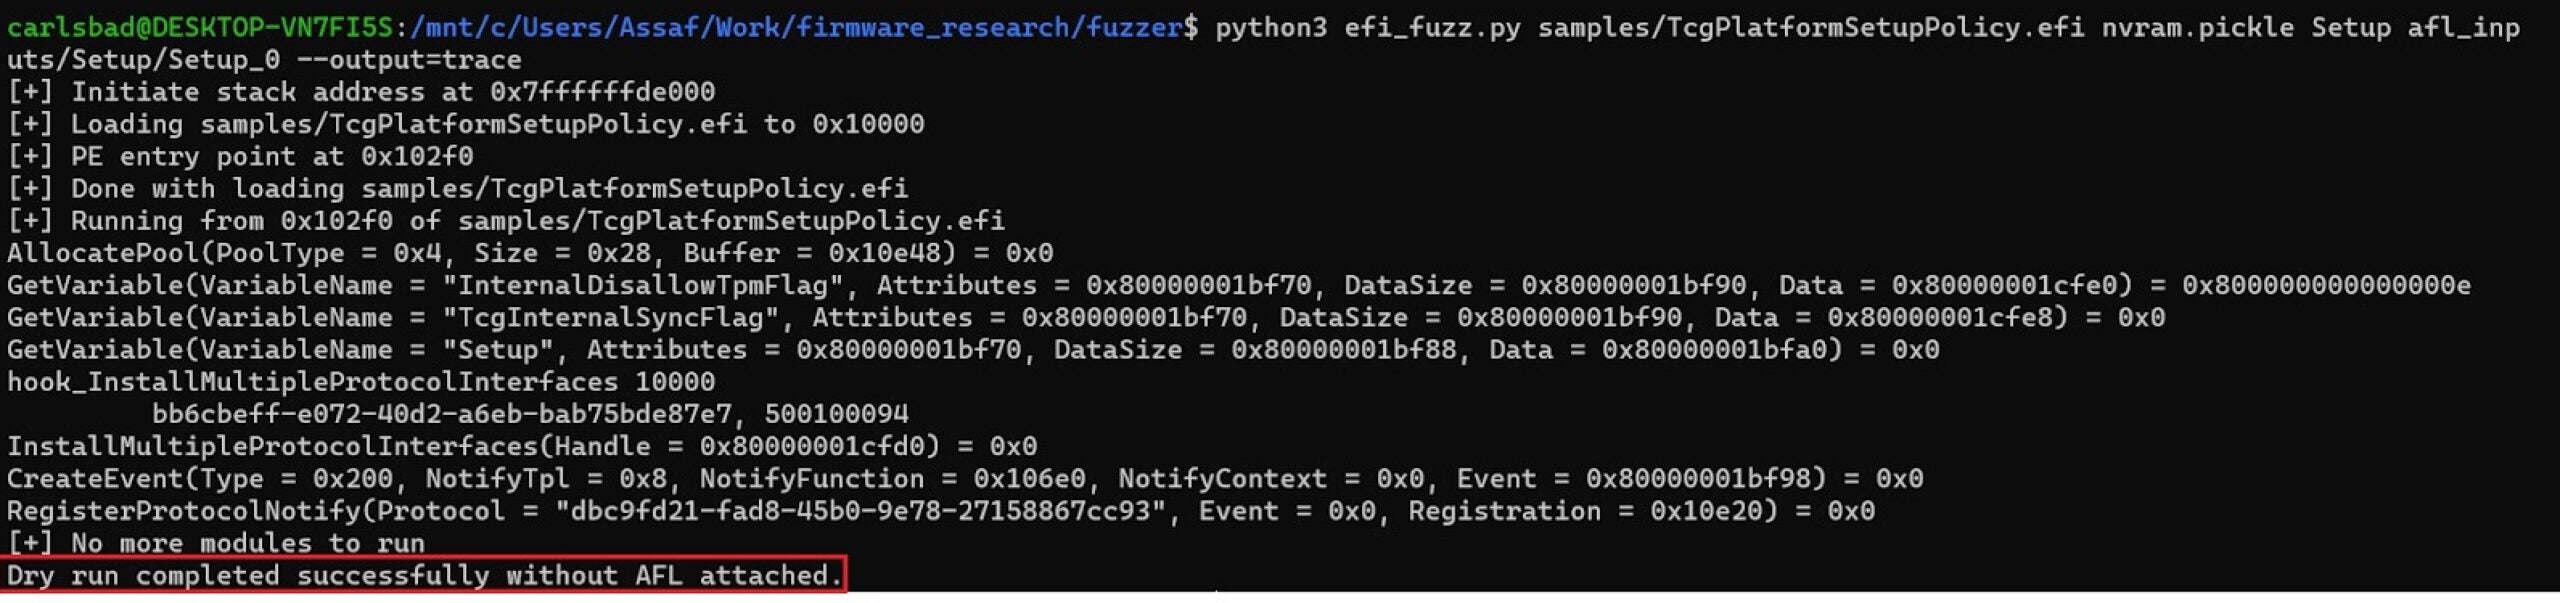
Figure 18 – a dry run of the fuzzer - In case the dry run didn’t complete successfully, use the following tips to help troubleshoot the problem:
-
- Use the –output switch to produce more verbose output. Valid options for this flag include ‘trace’, ‘disasm’ and ‘debug’. Generally speaking, ‘disasm’ gives most insights since it emits the actual assembly listing for the executed instructions.
- Increase the emulation timeout. This can be done by passing the –timeout flag along with a value specified in milliseconds.
- Sometimes, the dry run might crash long after the parsing of the NVRAM variables is done. In these cases, we might settle for partial emulation. To enable this feature, just pass the –end argument to the fuzzer along with the hexadecimal address of the last instruction to emulate.

Figure 19 – using the –output, –timeout and –end flags can help troubleshoot problems that occurred during the dry run -
- After we’re satisfied with the results of the dry run, we can finally move on to the real deal. During “wet” fuzzing, AFL++ will constantly yield new mutations for the chosen NVRAM variable. In turn, efi-fuzz will emulate the target binary with the new mutation and then report back coverage information to AFL++. Hopefully, the coverage information will help drive the mutation process towards more promising directions. The command line for “wet” fuzzing is given as:
afl-fuzz -i afl_inputs/<varname> -o afl_outputs/ -U -- python efi_fuzz.py <target> <nvram>@@ As an example, let’s try to fuzz a buggy UEFI driver developed specifically for that purpose, called NotMyUefiFault.
6. NotMyUefiFault
A while back, as part of the SysInternals suite of tools, Mark Russinovich developed and released a small tool he called NotMyFault. The basic idea behind NotMyFault was to create a tool that can be used to deliberately crash, hang, and cause kernel memory leaks on Windows systems. Its main target audience was kernel developers seeking useful ways to learn how to identify and diagnose device driver and hardware problems.
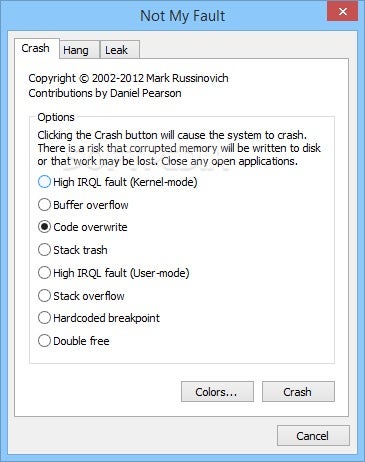
Feeding off this basic philosophy we began to develop a similar, UEFI-centric tool to generate different crashes and anti-patterns inside the UEFI emulation environment. Due to the similar nature of these two tools, and as an homage to Mark Russinovich and his work on SysInternals, we decided to name our tool NotMyUefiFault. However, unlike NotMyFault, which is meant to be an educational tool, we use NotMyUefiFault more as a sanity test for the fuzzer.
NotMyUefiFault works by simply reading an NVRAM variable named FaultType. Based on its value, it decides which bug class to deliberately generate according to the following legend:
- POOL_OVERFLOW_COPY_MEM: Triggers a pool overflow from BS->CopyMem()
- POOL_UNDERFLOW_COPY_MEM: Triggers a pool underflow from BS->CopyMem()
- POOL_OVERFLOW_SET_MEM: Triggers a pool overflow from BS->SetMem()
- POOL_UNDERFLOW_SET_MEM: Triggers a pool underflow from BS->SetMem()
- POOL_OVERFLOW_USER_CODE: Triggers a pool overflow from user code
- POOL_UNDERFLOW_USER_CODE: Triggers a pool underflow from user code
- POOL_OOB_READ_AHEAD: Triggers an out-of-bounds read ahead of the pool buffer
- POOL_OOB_READ_BEHIND: Triggers an out-of-bounds read behind the pool buffer
- POOL_DOUBLE_FREE: Frees the same pool block twice in a row
- POOL_INVALID_FREE: Frees a pointer which wasn’t allocated by BS->AllocatePool()
- POOL_UAF_READ: Reads from a pool buffer after it was freed
- POOL_UAF_WRITE: Writes to the pool buffer after it was freed
- NULL_DEREFERENCE_DETERMINISTIC: Writes to the NULL page
- NULL_DEREFERENCE_NON_DETERMINISTIC: Allocates a buffer with BS->AllocatePool(), then uses it without checking for NULL first
- STACK_BUFFER_OVERFLOW: Generates a stack-based buffer overflow
- STACK_UNINITIALIZED_MEMORY_LEAK: Discloses uninitialized stack memory via NVRAM
To exercise NotMyUefiFault, we need to:
- Create a directory with the fuzzing seeds. Here we chose 0xFFFFFFFF as the single base test case since it doesn’t correspond to any valid bug class value.
mkdir -p afl_inputs/FaultTypeecho -ne "xFFxFFxFFxFF" > afl_inputs/FaultType/FaultType_0 - Fire off the fuzzer:
afl-fuzz -T NotMyUefiFault -i afl_inputs/FaultType/ -o afl_outputs/ -U -- python efi_fuzz.py NotMyUefiFault/bin/NotMyUefiFault.efi nvram.pickle FaultType @@ - Wait until some crashes are detected, as can be seen in the screenshot below:
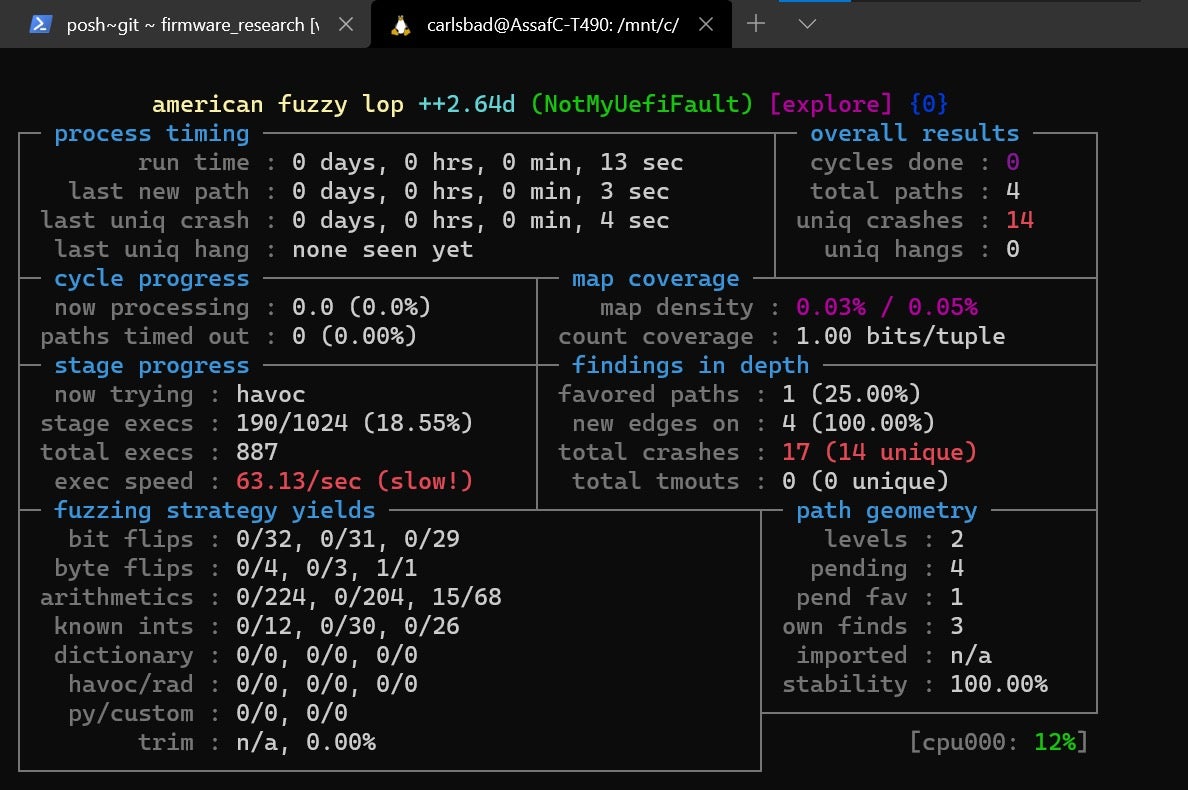
Figure 21 – by fuzzing NotMyUefiFault.efi, the fuzzer quickly identifies 14 out of the 16 vulnerable paths
After that, individual variable blobs which lead to crashes can be examined by browsing the afl_output/crashes directory:

Please note that if you wish to detect case #16 (STACK_UNINITIALIZED_MEMORY_LEAK) you’ll have to pass the -u, --track-uninitialized flag to the fuzzer explicitly.
7. Limitations and Closing Remarks
While experimenting with UEFI fuzzing, we quickly came to realize that emulating UEFI modules in isolation from one another will not get us very far. The main reason for this is that UEFI modules highly depend on each other and usually work in tandem to achieve certain goals. To some degree, emulating a single UEFI module is equivalent to loading a binary without mapping all the shared libraries it depends on to function properly. As such, isolated emulation is obviously not the right way to go.
As mentioned briefly in Part Two, the main unit through which inter-module calls are made in UEFI is called a protocol. A module can expose its own implementation for a given protocol by calling services such as InstallProtocolInterface() or InstallMultipleProtocolInterfaces(), hence acting as a protocol provider. In addition, a UEFI module can also consume protocols installed by other modules by using services such as LocateProtocol(), OpenProtocol(), etc. If the requested protocol is not present for some reason, the calling module can respond in one of three possible ways:
- Bail out with an appropriate error code such as
EFI_NOT_FOUND. - Implicitly assume that the requested protocol is already installed. In such cases, the calling module might not even check the validity of the returned interface pointer and will crash as soon as it tries to dereference it. Even though this might seem like a bug, the truth is that sometimes UEFI modules have very compelling reasons to believe that some other modules have executed earlier in the boot process. Therefore, they can logically deduce that certain protocols should already be available. More details about this topic will be conveyed in Part Four of the series.

Figure 23 – modules such as TxtDxe implicitly assume that some protocols are already available for their use - Lastly, the calling module can use the RegisterProtocolNotify() service to register a notification event that will be signaled once an interface has been installed for the protocol. The notification event is typically linked to a callback function and because of that, when the callback function finally gets invoked the calling module is guaranteed that the requested protocol is present. The common practice among UEFI developers is to use this callback function to call OpenProtocol() or LocateProtocol() once again, this time with success.
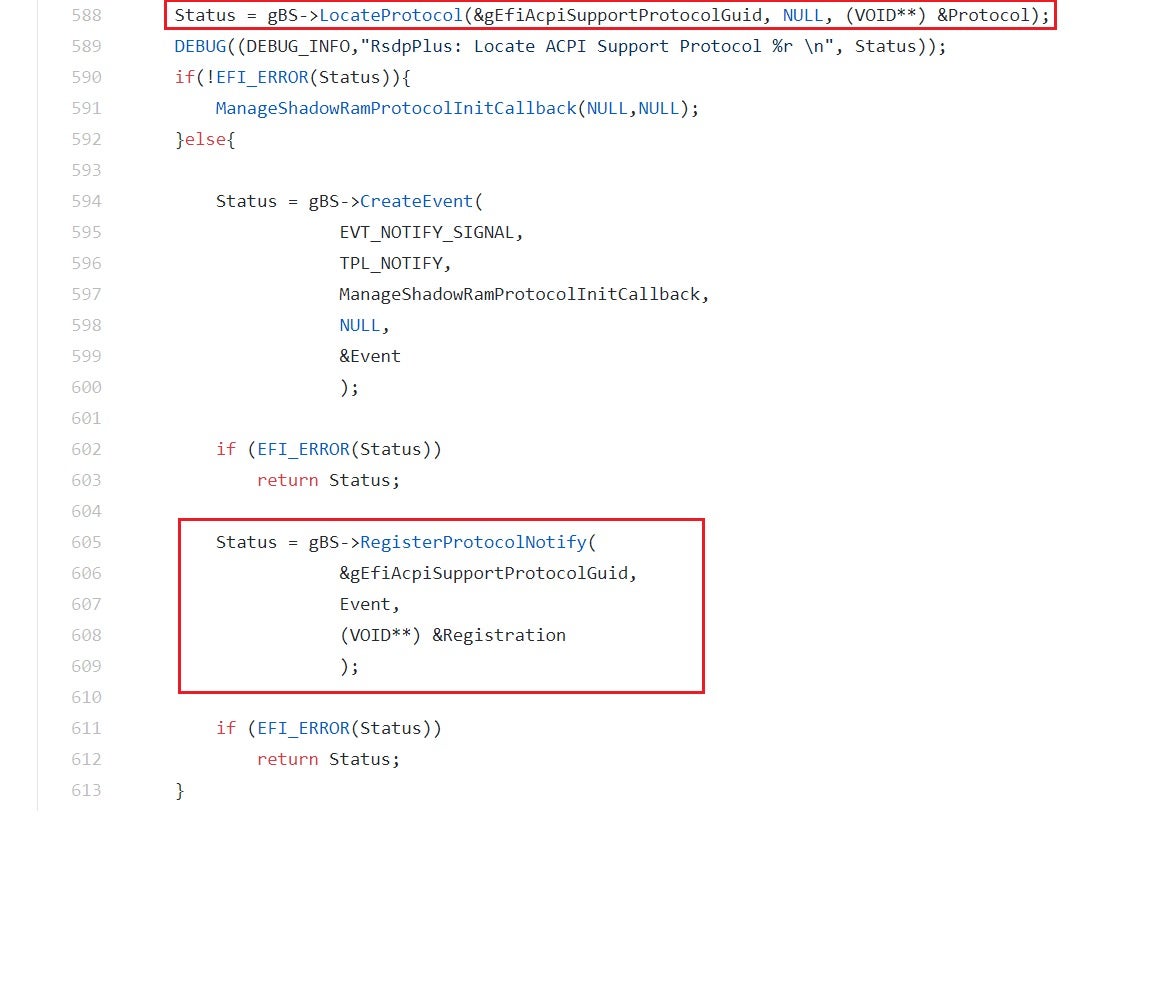
Figure 24 – RegisterProtocolNotify() can be used to handle cases where the protocol passed to LocateProtocol() has not yet been installed
From a fuzzing perspective, what’s common to all these different responses is that they dramatically limit our code coverage. To increase it, we should find a way to satisfy these protocol requests. As an example, let’s take a look at TcgDxe from the firmware image of our test machine.
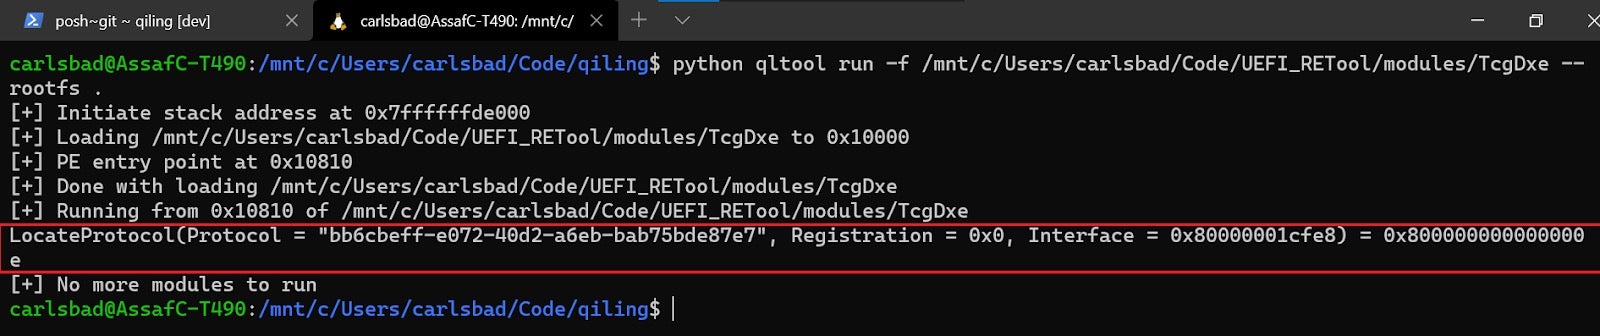
As can be seen in the screenshot above, TcgDxe chose strategy (1) for dealing with the missing protocol, that is bailing out. The question now becomes, how can we find the module which implements the protocol identified by bb6cbeff-e072-40d2-a6eb-bab75bde87e7, thus satisfying TcgDxe’s dependencies?
Unfortunately, this GUID does not appear on the GUIDs database of UEFITool, nor does it appear on any Google search results. That leaves us with a couple of options:
- Search for the binary byte sequence representing the GUID in all the modules originating from the firmware image. This approach has the obvious downside that it can’t tell the difference between provider modules and consumer modules, and therefore will require some manual work to sort things out.
- Use tools such as UEFI_RETool to construct the relationship graph between modules, then search for all modules upon which TcgDxe depends. Under the hood, UEFI_RETool attempts to pinpoint calls to provider and consumer services by analyzing the assembly code and looking for some specific patterns. While in theory this sounds promising, in reality the assembly code might look somewhat different from what UEFI_RETool expects, and therefore there is usually a substantial amount of misses associated with this approach.
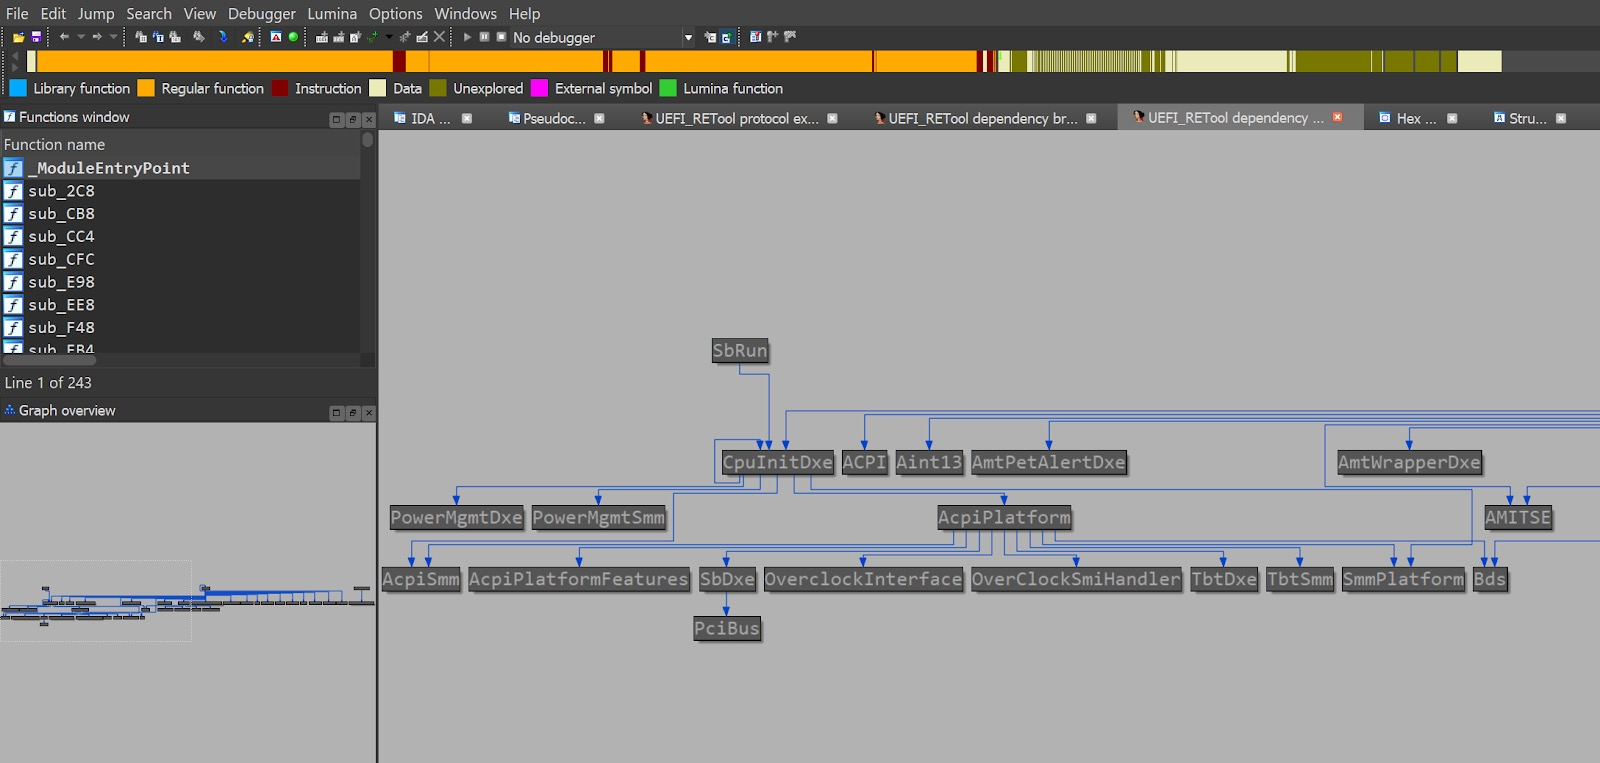
Figure 26 – Dependency graph for inter-related UEFI modules - Lastly, we can appeal to common-sense logic and heuristics to narrow down our search to just a handful of potential candidate modules. For example, in case of TcgDxe we might be tempted to load other modules that are prefixed with Tcg*, hoping one of them will register the longed for protocol.
After some research, we discovered that the protocol we were interested in indeed gets registered by another module named TcgPlatformSetupPolicy. Knowing that, we can now load both modules into the emulation environment, thus satisfying TcgDxe’s dependencies:

Although we were successful this time, our current solutions obviously don’t scale very well. What would happen, for example, if TcgPlatformSetupPolicy had another set of dependencies which should have been resolved manually?
To mitigate these difficulties, we should add to our fuzzer some sort of an orchestration layer. Ideally, this layer would automatically resolve dependencies between modules and will guarantee that a module is only loaded after all its dependencies have been resolved. Obviously, using such an orchestration layer will allow us to gradually move from fuzzing of individual modules into fuzzing of entire FVs, for example the volume which hosts the DXE phase. This topic, alongside some other bonuses such as harnessing symbolic execution engines for fuzzing, will be discussed in subsequent parts of this series.
We’d like to take this opportunity to thank Caleb Fenton, Matan Mates, Phil Stokes and Migo Kedem for their support, editing, and suggestions.
Other Posts in Our UEFI Series
Part 1: Moving From Common-Sense Knowledge About UEFI To Actually Dumping UEFI Firmware
Part 2: Moving From Manual Reverse Engineering of UEFI Modules To Dynamic Emulation of UEFI Firmware
Part 4: Adventures From UEFI Land: the Hunt For the S3 Boot Script