
In this post, Daniel discusses the Gootkit malware banking trojan and its use of Anti Analysis techniques.
The Gootkit Banking Trojan was discovered back in 2014, and utilizes the Node.JS library to perform a range of malicious tasks, from website injections and password grabbing, all the way up to video recording and remote VNC capabilities. Since its discovery in 2014, the actors behind Gootkit have continued to update the codebase to slow down analysis and thwart automated sandboxes. This post will take a look into the first stage of Gootkit, which contains the unpacking phase and a malicious downloader that sets up the infected system, and its multiple anti-analysis mechanisms.
Unpacking
MD5 of Packed Sample: 0b50ae28e1c6945d23f59dd2e17b5632
With this specific sample, the unpacking routine is fairly trivial, as it performs self-injection. Simply put, the unpacker will:
Allocate a region of memory -> Decrypt shellcode and copy to the allocated region -> Execute the shellcode, decrypting the first stage Gootkit executable -> Overwrite unpacked with decrypted executable -> Change protections on the decrypted executable and transfer execution to it.
Therefore, in order to unpack it, place breakpoints on both VirtualAlloc and VirtualProtect, and look out for executable headers appearing in the allocated regions of memory.

MD5 of Unpacked Sample: c342af62302936720e52679bc431d5a8
Immediately upon opening the sample in IDA, you’ll notice the use of the CreateThread API – this is used excessively throughout the binary, potentially as an anti-dynamic analysis method. It becomes quite difficult to debug the program due to the fact that multiple threads are running at once; however, this can be avoided by focusing on one thread per execution. Static analysis methods are also hindered, due to the levels of obfuscation utilized by the sample. Whilst there are quite a few strings in plaintext, nearly all of the important strings used are decrypted at run time, using a simple but effective XOR algorithm. Not only are the strings encrypted, they are also stored as stack strings, making it more complex to extract the important data.
As mentioned previously, the algorithm is fairly simple. Essentially what happens is there are 2 different “strings”. The first string (typically shorter), will loop around, XOR’ing each byte with a byte of the second string. An example of this algorithm in Python can be seen below.
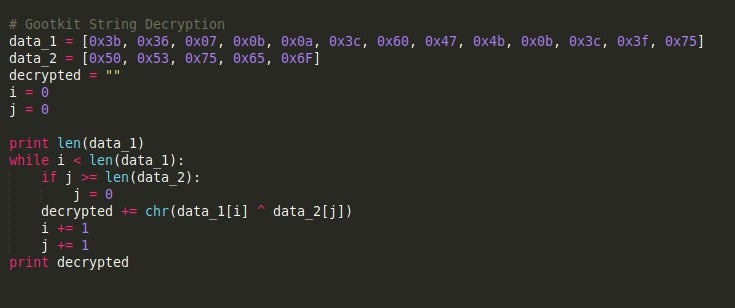
The example above will return the string kernel32.dll.
Before Gootkit begins to perform its malicious routines, it first checks the arguments passed to it – this determines the path it follows. The possible arguments that Gootkit accepts are:
--reinstall
--service
-test
--vwxyz
If no argument is given, Gootkit will perform a setup routine, and then execute itself with the --vwxyz argument. The -test argument simply causes the process to exit, whereas the --reinstall argument will reinstall Gootkit using the persistence method that we will be covering in the next post. Finally, the --service argument will simply set an additional environment variable, specifically the variable name USERNAME_REQUIRED, with the value set as TRUE. In this post we, will be focusing primarily on the setup phase, to understand the steps Gootkit takes before executing itself with the --vwxyz argument.
Anti-Analysis Functionality
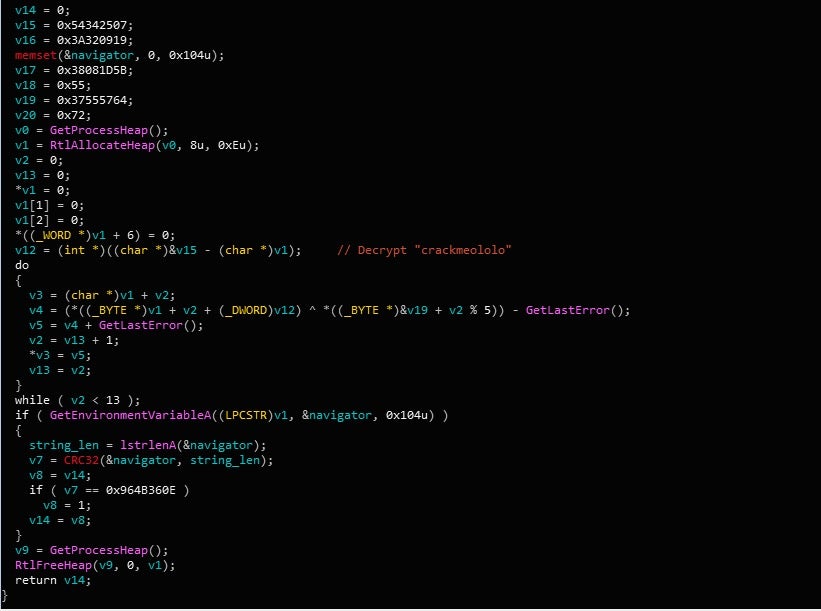
As mentioned previously, Gootkit packs plenty of Anti-Analysis features to evade sandboxes, prevent execution in a Virtual Machine, and slow down analysis. Interestingly, the functions responsible for these features are skipped if a specific environment variable is set. The variable that is set during runtime is named crackmeololo, and the value given to it is navigator. When it comes to checking the value, rather than compare it to a string, Gootkit will utilize CRC-32/JAMCRC hashing in order to check the validity. If the CRC hashes don’t match, the system checks begin.
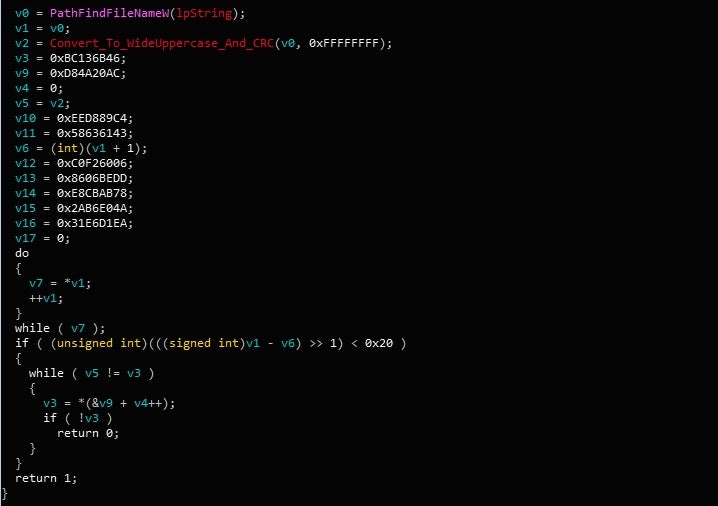
The first check that Gootkit performs is a filename check. Simply put, there is a hardcoded list of CRC hashed filenames inside the binary, which are compared against the hash of the current filename. If a match is found, Gootkit will create a batch file that will delete the original executable. The process will then exit. A list of the filenames that Gootkit searches for can be seen below.
SAMPLE.EXE
MALWARE.EXE
BOT.EXE
SANDBOX.EXE
TEST.EXE
KLAVME.EXE
MYAPP.EXE
TESTAPP.EXE
The next checks are performed almost immediately after the filename check. Gootkit will create another thread, where it will output the string “MP3 file corrupted” using OutputDebugStringA, and then check the environment variable crackmeololo once again. If the CRC hashes match, it will continue on to decrypt the on board configuration – if not, it will perform a more in depth check of the environment.
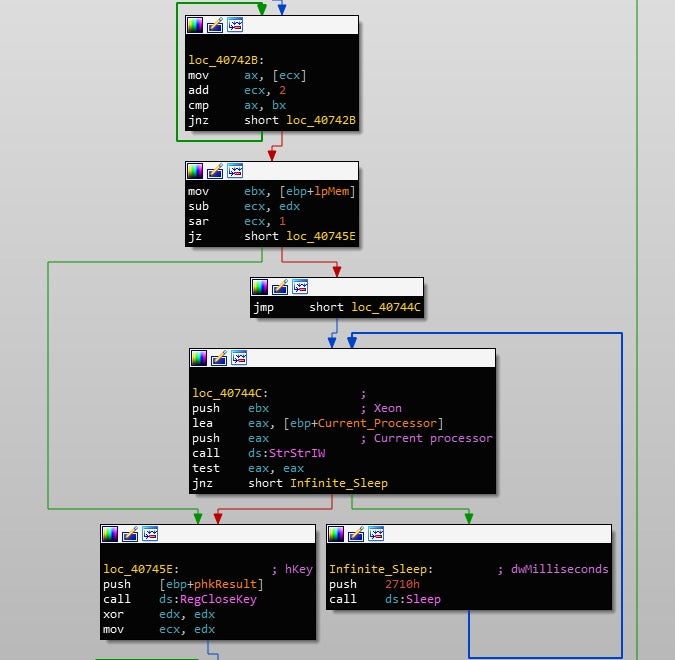
First, it begins by opening the registry key HardwareDESCRIPTIONSystemCentralProcessor0, and then queries the ProcessorNameString, comparing the value to Xeon. The Xeon processor is used in servers primarily, and not in laptops or desktops. This is a good indicator that the malware is running in a sandbox, so if it is detected, Gootkit will enter an endless sleep-loop cycle.
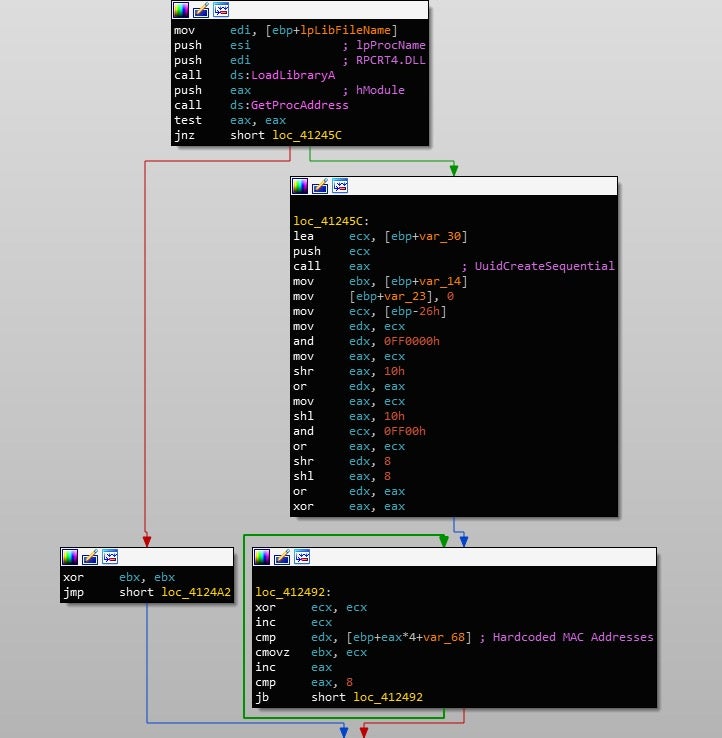
If Xeon is not detected, execution will resume; however, the next check is a lot more intensive. Similar to the filename check, Gootkit also contains a hardcoded list of MAC address identifiers used to detect sandboxes or VMs. After loading RPCRT4.DLL, it will call UuidCreateSequential, which uses the MAC Address to create a GUID. If any of the values match, it will enter an infinite sleep-loop cycle once again. A list of the hardcoded MAC Addresses along with the corresponding vendors can be seen below.
| F01FAF00 | Dell |
| 00505600 | VMWare |
| 8002700 | PCS System Technology GmbH |
| 000C2900 | VMWare |
| 00056900 | VMWare |
| 0003FF00 | Microsoft |
| 001C4200 | Parallels |
| 00163E00 | XenSource |
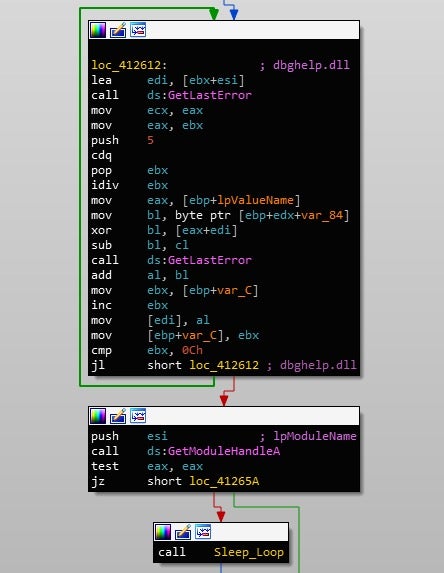
Next, Gootkit will call GetModuleHandleA in an attempt to get a handle to either dbghelp.dll and sbiedll.dll, in an attempt to detect a present debugger or the sandbox Sandboxie. If a handle is returned successfully, an infinite sleep cycle will occur. Continuing on, the current username will be retrieved with a call to GetUserNameA, and compared to CurrentUser and Sandbox. The computer name will then be retrieved and compared to SANDBOX and 7SILVIA. As you may have guessed, if any of these match, the sample will enter into an infinite sleep cycle.
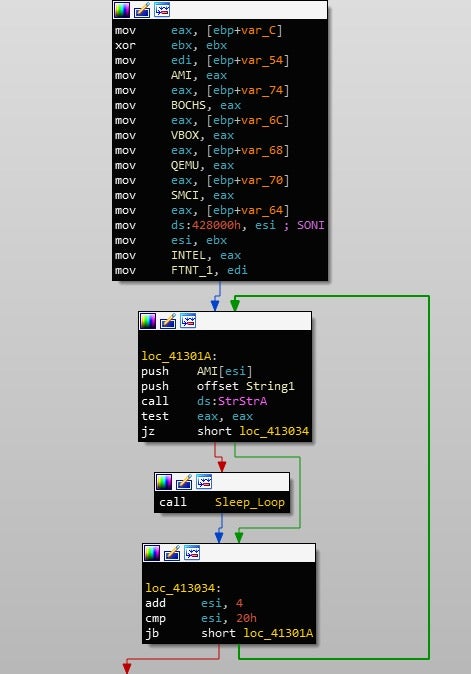
Continuing on, Gootkit will query HARDWAREDESCRIPTIONSystemSystemBiosVersion and compare the value to; AMI, BOCHS, VBOX, QEMU, SMCI, INTEL – 6040000, FTNT-1, and SONI. Once again, match = infinite sleep cycle.
Yet another registry query is performed, this time with the key HARDWAREDescriptionSystemVideoBiosVersion, with the value being compared to VirtualBox. Finally, it queries SOFTWAREMicrosoftWindowsCurrentVersionSystemBiosVersion or HARDWAREDESCRIPTIONSystemSystemBiosVersion for 3 values that correspond to Joe Sandbox and CWSandbox:
55274-640-2673064-23950: Joe Sandbox
76487-644-3177037-23510: CWSandbox
76487-337-8429955-22614: CWSandbox
If all checks are passed, then execution of the sample will continue, by setting up persistence and retrieving the payload from the C2 server. Before doing that, it will check its filename once again, using the same CRC hashing we saw earlier.
In the next post, we will take a look at the persistence method used by Gootkit, and take a look at the --reinstall pathway, as well as the communications routine used by the sample to retrieve the final stage.


